OBDSTAR DP plus ECU clone car List

OBDSTAR DP PLUS ECU clone List incl. Volvo GM PSA etc, next is how to do ECU clone and ends with ECU clone advantages.

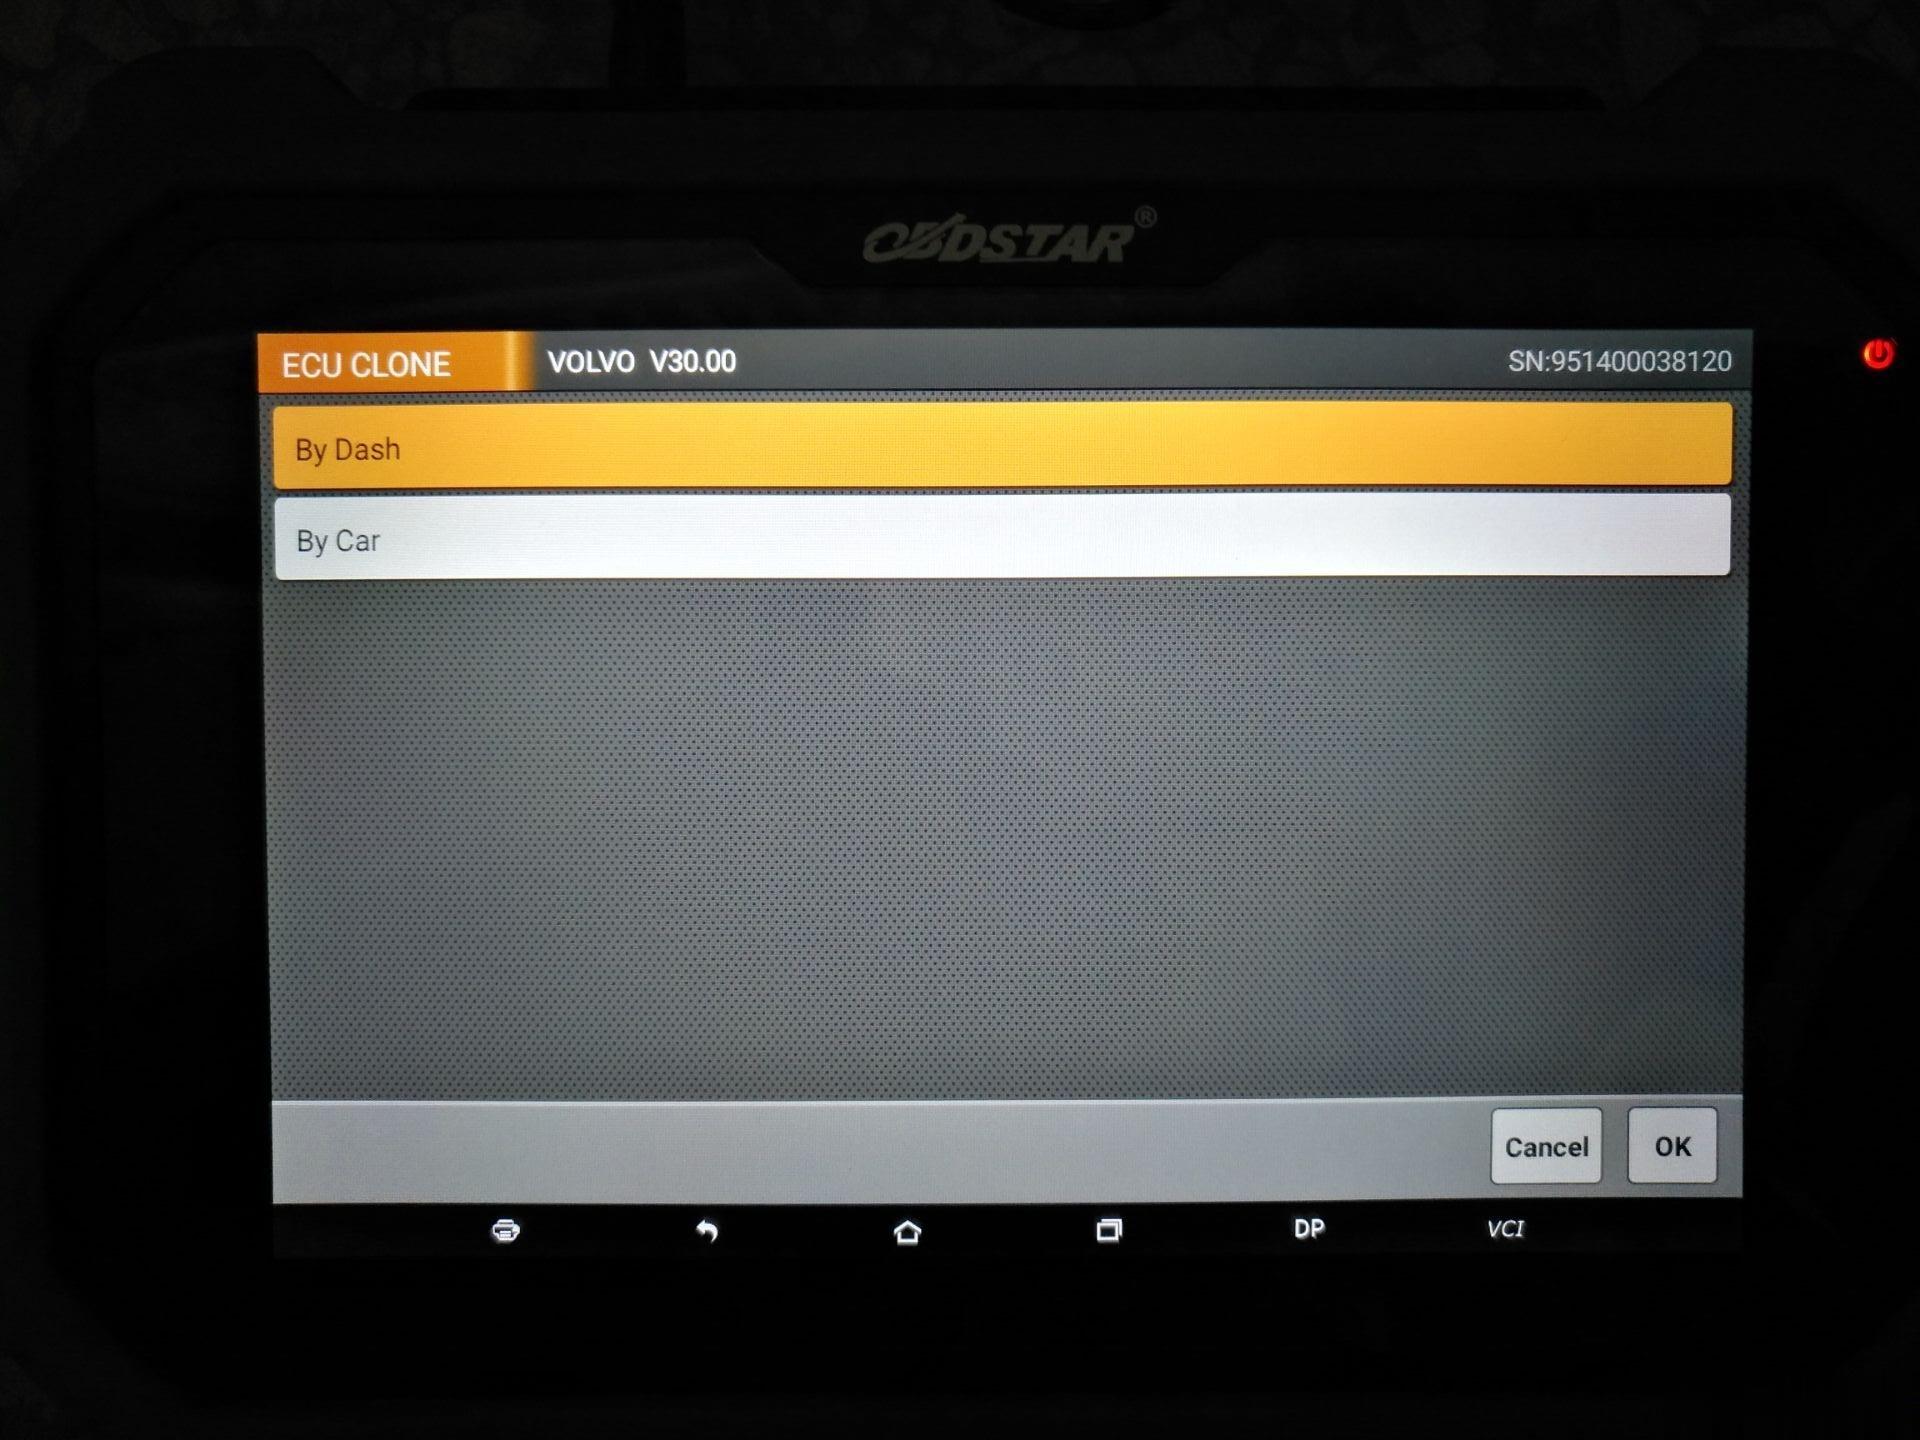
Volvo ECU clone list (obdstar Key Master / X300 DP Plus C Configuration)
VOLVO V30.00
VOLVO
By Dash
DASH Detect
0L85D
1M80F
1K78X
1H56A
3K91D
3L16Y
4F73K
By Car
S80
2007-
XC60
2007-
XC70
2007-
PSAECU clone list (obdstar Key Master / X300 DP Plus C Configuration)
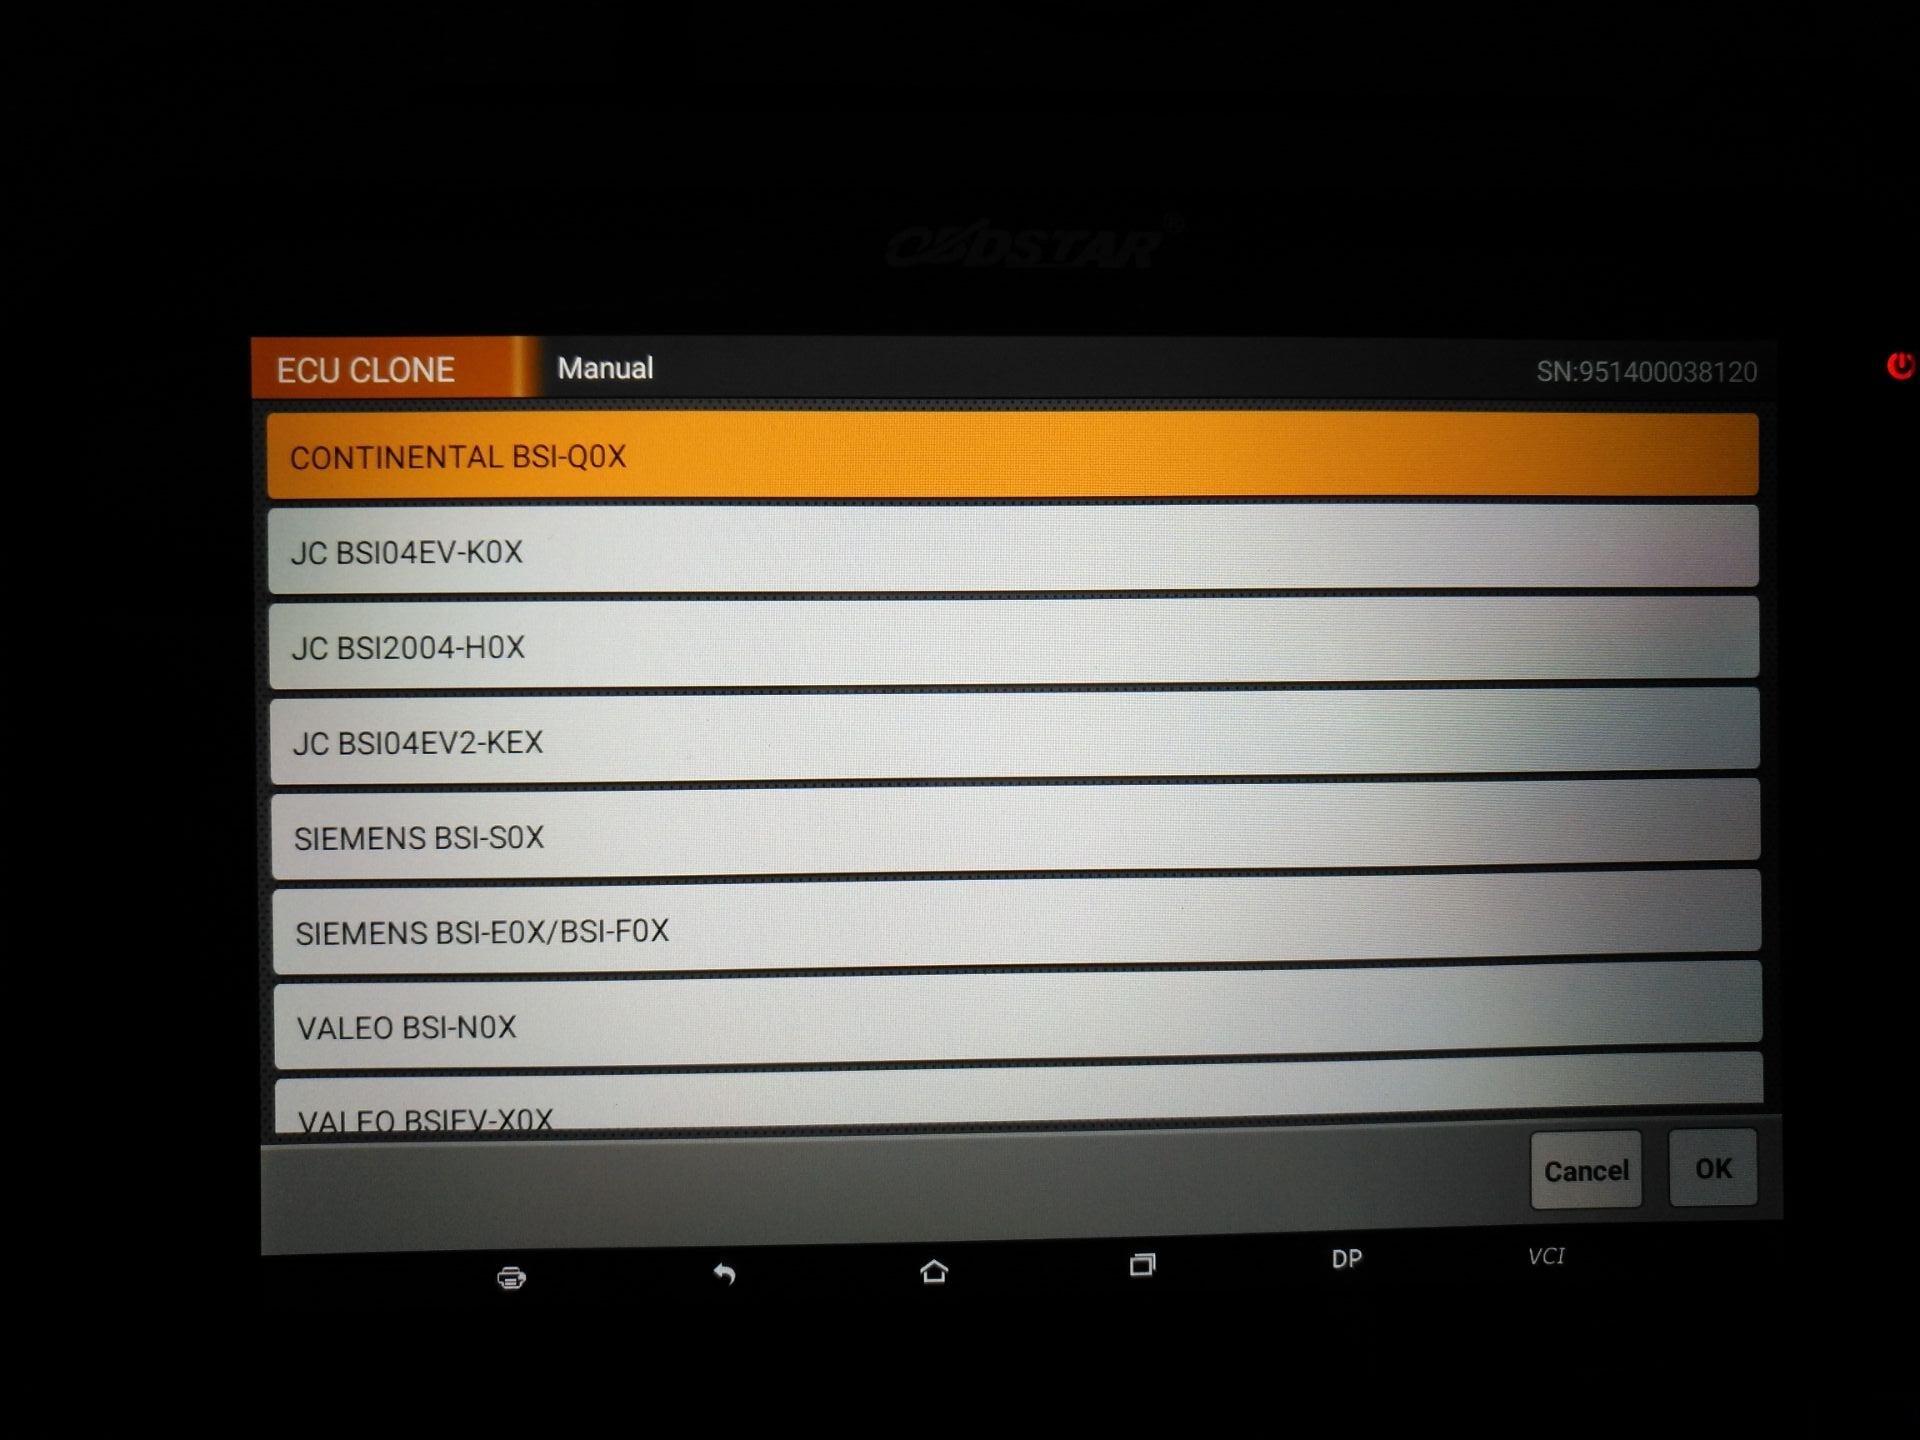
PSA V30.02
PSA
BSI(BCM)
Auto
Manual
CONTINENTAL BSI-Q0X
JC BSI04EV-K0X
JC BSI2004-H0X
JC BSI04EV2-KEX
SIEMENS BSI-S0X
SIEMENS BSI-E0X/BSI-F0X
VALEO BSI-N0X
VALEO BSIEV-X0X
VALEO BSI2004-P0X
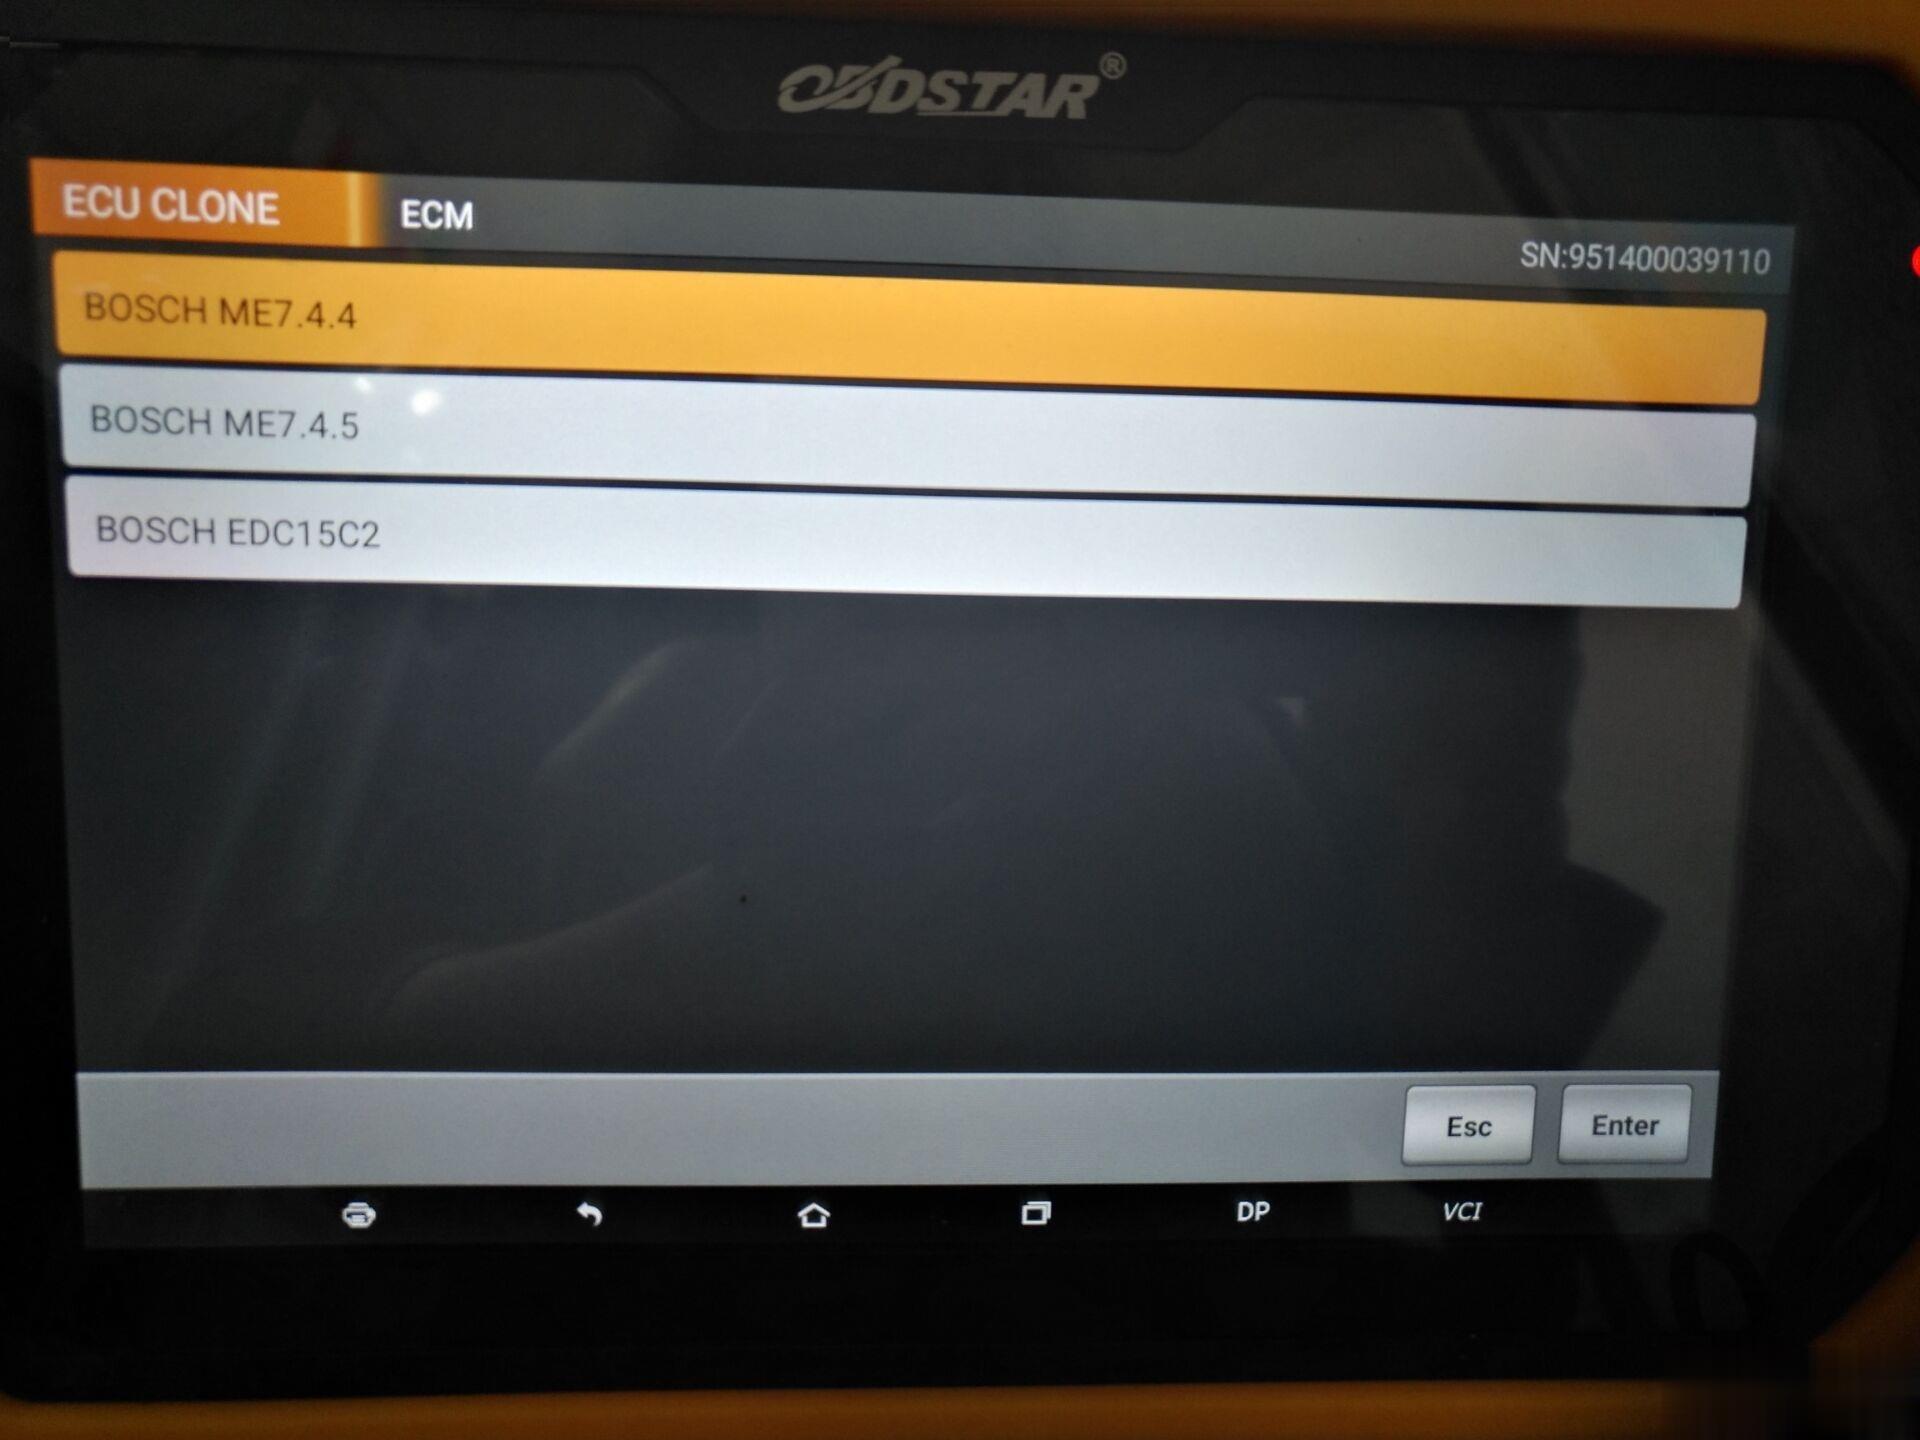
ECM
BOSCH ME7.4.4
BOSCH ME7.4.5
BOSCH EDC15C2
1X Connect
3X Connect
OBDSTAR-DP-plus-ECU-clone-car-List-3
GM ECU Clone (obdstar Key Master / X300 DP Plus C Configuration)
GM V30.00
Auto
Manual
BOSCH 70F3558+24C32
BOSCH 70F3385+24C16
BOSCH 70F3469+24C16
CONTINENTAL 70F3469+95160(25160)
CONTINENTAL 70F3558+95320(25320)
DELPHI 70F3238+93C86
DELPHI 70F3379+93C86

BOSCH V30.00
BOSCH
ECM
BOSCH ME7.4.4
BOSCH ME7.4.5
BOSCH EDC15C2
1X Connect
3X Connect
For newest update, please refer to the OBDSTAR official site.
How to use X300 DP Plus to operate ECU clone?
To perform ECU cloning/ programming, you need to use the following Wiring harness in the package.
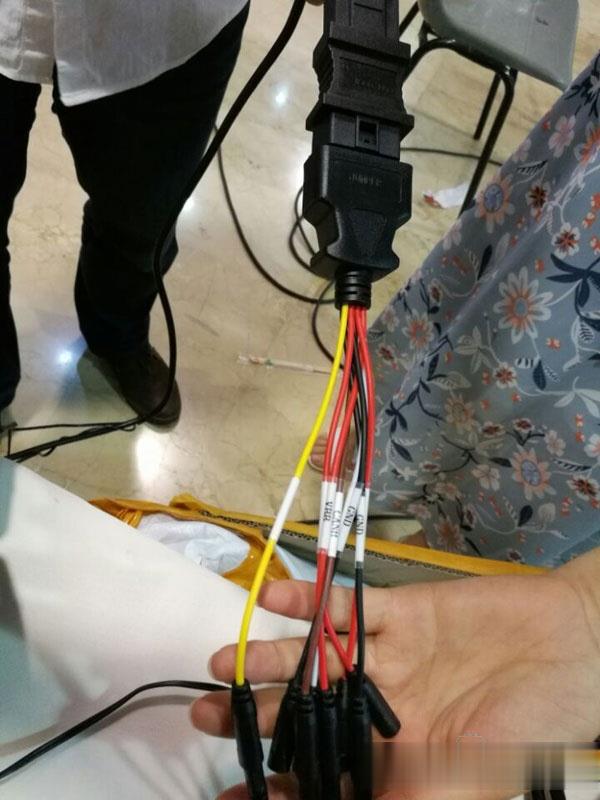
Image source
Instruction:
Youtube video is coming soon. Or add the obdstar C configuration package into your favorite and video is coming.
Anyway, obdstar DP plus screen will prompt you when to use the wiring harness and how to use.
ECU Clone purpose and advantages :
1. ECU Clone, means ECU duplication.
The device copies all the data from the original vehicle ECU, and then writes all data copied into ECU with the same hardware to realize the same ECU function with the original vehicle.
2. Clone directly when replacing a new or a used ECU!
Without online matching in 4S store or removal of ECU bonding wire for reading and writing! Directly write without dismantling OBD!
3. Three features for ECU Clone:
A. Free of 4S online:
break monopoly from 4S, benefiting automobile maintenance industry
B. Simplified operation procedures: realize foolproof operation
C. Non-dismantling with zero risks: read and write data without dismantling ECU
How to Configure Nissan Consult 3 Work on Jdiag Elite J2534
This article I want to share the guide on how to configure Consult-3 Plus for Nissan work on Jdiag Elite J2534.
Preparations:
Nissan Consult 3 Plus All Version Free Download
Procedures:
Open Nissan Consult 3 Plus software on Desktop
Connect JDiag Elite to the laptop USB and OBDII cable to the OBDII port on the car
Choose JDiag hardware
Choose the signal module to read out information
Then work with it
Then the details for you…
Open Nissan Consult 3 Plus software
Connect JDiag Elite J2534 device to the laptop USB and OBDII cable to the OBDII port on the car
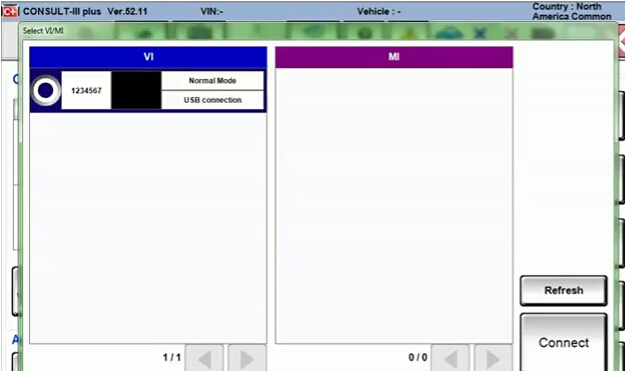
Select VI/MI in Consult 3 Plus ver.52.11

Select VI and click on Connect

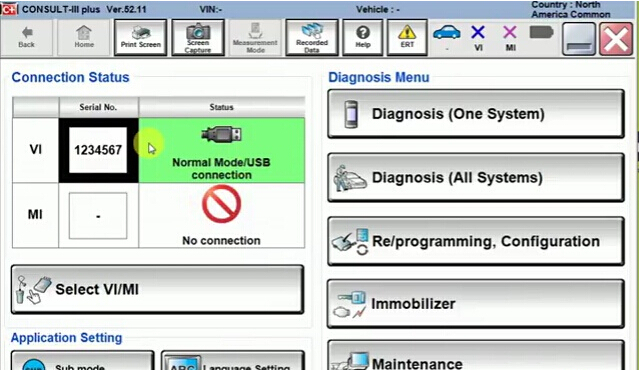
Then Close
You’ll see the connection status: VI: Normal module/USB connection
Installing Techline Connect
Techline Connect — GM’s latest tool that brings together diagnostic information and vehicle data in one easy-to-use application — is currently being rolled out by state to GM dealerships (U.S.). The rollout to dealerships in Canada will begin later in 2019.
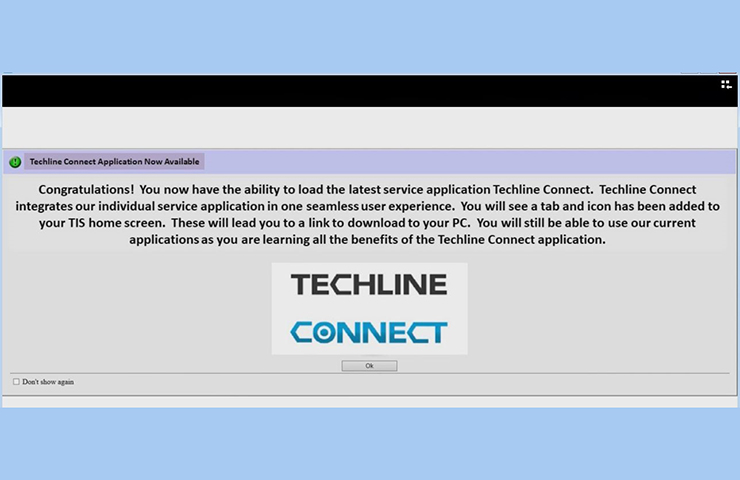
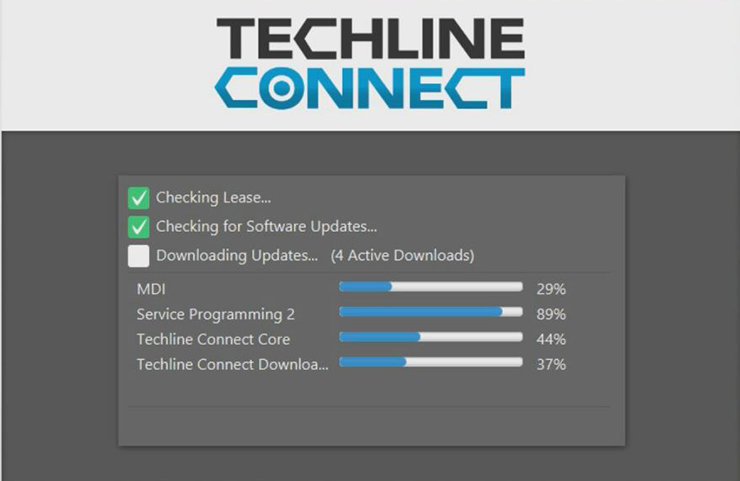
When the application is available in your dealership, a dialog box will appear when launching TIS2Web. (Fig. 1)
To ensure a smooth installation as well as to be ready to use the system right away, keep the following guidelines in mind.
Operating System Recommendations
Computer system recommendations for dealerships to ensure proper performance of the application include:
* Display: 15-inch high definition (HD) display
* Hard Drive: 500+ GB
* System Memory (RAM): 8GB
* Processor: Intel Core i7 5th Gen
* Operating System: Windows 10 Professional, 64 bit
Check the latest version of the GM Dealer Infrastructure Guidelines (DIG) for all required specifications.
Installation
Most dealerships will need approximately 30 minutes to complete the full Techline Connect installation. The dealership’s system administrator should be available to assist with any network security restrictions or settings.
Techline Connect will install components to the local personal computer (PC), including Java and the application.
A Techline Connect User Guide also is included in the application download. It includes installation instructions and an overview of the application.
Getting Started
Techline Connect can be installed on a new PC as well as one that already uses TIS2Web and GDS 2.
To get started:
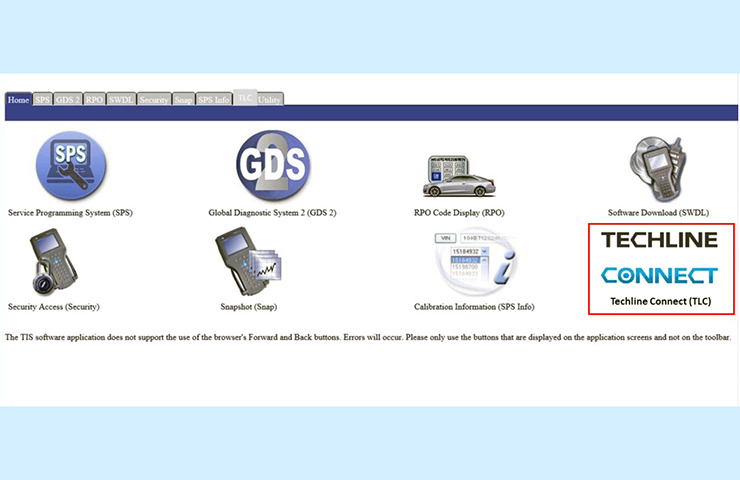
* Log in to the TIS2Web main page using your GlobalConnect ID and password. Select the Techline Connect icon. (Fig. 2)
* Select the Start TLC Download button. The download will install a Download Manager on the PC. The Download Manager will automatically download components such as GDS 2 application and data, large calibration files, MDI updates and other applications as well as updates to these applications, based on the version already installed on the PC. It also will automatically check for valid application leases and renew leases if necessary. Any updates to the application will download and install automatically. (Fig. 3)
* On the initial installation of Techline Connect, the GDS 2 Diagnostic Package must be installed. The installation is done through the Manage Diagnostic Package function in GDS 2. When installing, answer “Yes” to keep previous GDS 2 sessions.
* On new PCs, MDI Setup will need to be completed. The MDI software components are included in the Techline Connect download. On currently used PCs, the existing MDI setup will be used.
All applications will need to be set up to allow third party downloads in order for the latest updates to be downloaded and installed to keep all applications up to date.
Launching Techline Connect
Techline Connect manages the MDI connection as well as the vehicle connection, providing access to diagnostic data and vehicle information.
To launch the app:
* Click the icon to launch Techine Connect.
* Connect the MDI/VCI and establish the device connection.
* With the MDI/VCI connected to the vehicle, select MDI from the MDI Explorer when prompted.
When a connection is established, Techline Connect will automatically connect to the vehicle and retrieve the VIN. The VIN and connection status are shown at the top of the dashboard. In addition, Investigate Vehicle History (IVH) information, Field Actions and Warranty History for the vehicle are automatically displayed.
From the Techline Connect Dashboard, users can access GM diagnostic applications, Service Information, and other functions in multiple panels or windows. (Fig. 4)
How to choose a decent auto diagnostic tool to reprogram Nissan
Reprogramming an outdated ECU is cheaper, quicker and more efficient than replacement. Nissan offers the tools, information and systems to achieve re-flashing success in your shop.
Price: inexpensive
Reprogramming an ECU is an inexpensive way to improve its function. Any modern Nissan or Infiniti vehicle will likely have at least one control unit that can be reprogrammed for any number of reasons, such as reducing emissions, improving drivability, fixing bugs, or increasing component lifespan. The cost of reprogramming a control unit is only a small fraction of replacing an older control unit with an updated version, so it provides Nissan owners with a way to enjoy the fruits of engineering improvements without spending much money
All Nissan and Infiniti dealerships offer reprogramming to their customers, but as many independents know, reprogramming is not a “dealer only” service. An independent shop that is serious about offering its customers good value should be equipped and competent enough to offer reprogramming. Many customer complaints simply cannot be resolved without a change in software, so a shop that is not prepared to install the latest software will not be able to fix the car. That’s a pretty compelling reason to read up and tool up.
Reprogramming tool – Where to?
The owner is able to purchase the genuine equipment, information, and calibration files the dealerships use www.nissantechmate.com, plus there’s even a less-expensive option available off https://www.obd2tool.com/ that provides working china clone equipment for reprogramming offline.
The following Nissan Professional Diagnostic Tool options are available:
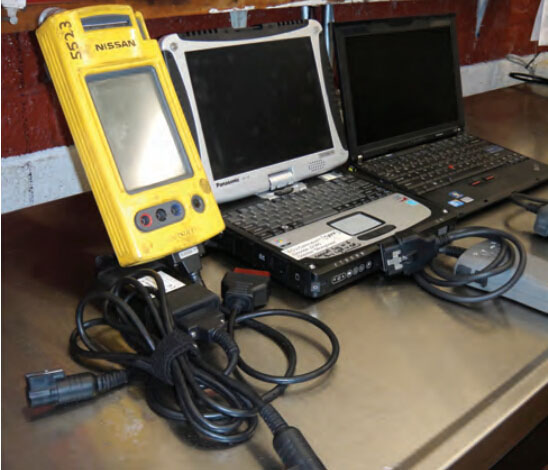
CONSULT II
This was a great scan tool and is still suitable for reprogramming, but it’s past its prime. The CONSULT III or III plus offer post-2006 coverage and a far easier procedure. The CONSULT II is no longer available for purchase, but if you already own one, Nissan is still supporting reprogramming via this device, so it’s an acceptable choice for pre-2007 vehicles.
CONSULT III
The CONSULT III is a powerful scan tool and is currently the best way to flash Nissan control units.
The original kit can be purchased from www.nissantechmate.com, and comes with a ToughBook, VI (Vehicle Interface), MI (Measurement Interface), and accessories
CONSULT III Plus
The CONSULT III plus is a full-featured scan tool and is the fastest and easiest way to get into re-flashing. It will also have the widest coverage. It has an improved interface that is more intuitive than that of the CONSULT III. The user will need to provide a laptop; the kit comes with only the VI (Vehicle Interface) and software.
You’ll be able to purchase the C-III plus kit to upgrade your existing C-III, or purchase a full C-III plus kit (including laptop) at www.nissantechmate.com later this year. Remember, Nissan CONSULT software will only operate on the special Toughbook.
Also, CONSULT III Plus clone comes with high quality confirmed. 545 USD should be the cheapest way to do Nissan ECU reprogramming:
– https://www.obd2tool.com/goods-1610-Nissan+Consult-3+Plus+V3411+Nissan+Diagnostic+Tool.html you can do offline reprogramming without any account and password
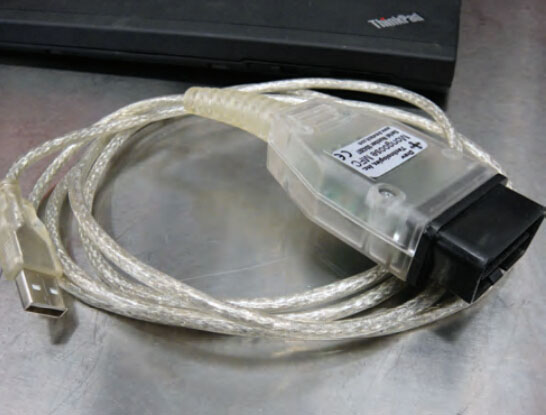
Nissan-validated J-2534 pass-thru interface
A J-2534 pass-thru interface can be used in conjunction with NERs (Nissan ECU Reprogramming Software) to re-flash Nissan and Infiniti vehicles. NERs is not a diagnostic interface; it can only be used for re-flashing, so that is one disadvantage of going the J-2534 route. Another potential downside is reliability. Nissan puts a lot of R&D into the CONSULT scan tools, and they have been extensively tested at dealerships. A generic J-2534 device will likely not see action until later in the product lifecycle, so may not be as polished. That being said, Nissan has tested and validated a few of the J-2534 devices available, and has determined that they seem to work well with NERs.
The following J-2534 pass-thru interfaces are currently Nissan-validated:
DrewTech CarDAQ-plus
Actia Passthru+XS
DrewTech Mongoose
Consult VIs (III and III plus)
Consult 3 (Plus) china clone – No worries!
The cloned Consult 3 (Plus) is for personal use and repair shops sometimes, but NOT for people looking for the original only.
The chinese is good at cloning. But you may worry about the quality. Here, a good tip for you is “you will get what you pay for”. you might see a tool at different prices and sometimes there might be a big gap between the cheapest one and the most expensive one. Just learn more about the site to check if it’s reliable or not. Usually, amazon or ebay should be your way to go. But for car diagnostic and programming tool, you might need help/tech support from experts. Search “car diag” on google and you’ll find a lot. Here OBD2TOOL is the first one that google suggested!
It’s not that hard
Reprogramming is something most technicians will find fairly easy. If you have computer skills, you’ll likely feel like a pro after you have a couple experiences under your belt. However, don’t get too comfortable and start to get sloppy. If a reprogramming fails, the ECU may be permanently damaged. This is colloquially referred to as “bricking” because the ECU becomes about as useful as brick for vehicle control (yet probably not as useful as a brick for structural purposes). Regardless, it will be of little use to anyone who is not looking for a very expensive paperweight. The path to avoiding a brick is easy: Just follow the instructions outlined in the TSB and the reprogramming overviews. The key to a successful re-flash is avoiding interruptions.
First, the ECU needs an adequate voltage supply. If the vehicle’s 12V battery does not maintain a steady voltage during the reprogramming, the procedure may fail. Therefore, the battery should be tested before beginning to flash. However, even if the battery is in great condition and fully charged, it’s a very good idea to have a backup, just in case. A fully-charged booster pack is one option, but then there’s always the chance that the booster pack might not be as charged as you think it is.
The ideal solution is a power supply. It’s like a battery charger, but its output is very clean with very little ripple, and the “charging” voltage is much lower than normal, typically 13.5V. The Nissan-recommended Midtronics GR8-1200 has a power-supply mode that works well for reprogramming. There are other products that will work, but you’ll need to verify their suitability on your own. Don’t use a standard battery charger. They are often very “dirty” (AC in the DC) and usually have the potential to charge at too high a voltage for safe re-flashing.
The laptop and VI, or scan tool, will also need a steady power supply. Even if the laptop battery is fully charged, and in good condition, plugging the laptop into a wall outlet is a good idea. It just takes a few seconds and if the laptop were to power down midflash, it would cause some real problems.
Preventing software interruptions is also important. The laptop computer used for re-flashing should have minimal software installed. There’s no way to predict how NERS will be affected by the millions of different software packages available. Keeping the system clean is the best way to avoid conflicts.
This may sound crazy to IT managers, but automatic Windows updates should be turned off. One reason is that an automatic restart is bad news during mid-flash. If the technician is watching the flash, he can prevent the restart, but most techs will start the flash, and then do something else while it completes. The other reason is that major changes in the operating system may cause problems. For these reasons, updates should be done manually, and major updates, like service packs, should not be installed until you’ve verified that they won’t cause problems.
Wireless communications are especially prone to interference. You may find some Nissan material that depicts a CONSULT III with a wireless connection to the VI while reprogramming, but using the USB connection may be a better choice. Be sure the USB cable connections are tight. Loose connections can cause an interruption and resulting “brick.” Cell phones, lighting, welding, and a plethora of other noisy electrical devices and electronics can be found in a shop environment. Why take a chance?
The final source of potential interruption is human interference. Perhaps a co-worker notices you’ve “left the key on” and helps you out by turning it off. Or, he decides he needs to move the car. Or, he needs the scan tool and sees that you aren’t using it right now. Unless you plan on standing guard, post a sign on the car so others know what’s going on and leave the car alone.
When and how to re-flash
Now you know what hardware you’ll need to begin re-flashing and how to avoid damaging the ECU, but there are still some lingering questions such as, “When should a re-flash be performed?” and “How is it done?”
The decision to re-flash always starts with a Technical Service Bulletin. Whenever an ECU update is created, a TSB is issued to explain the reasons for the update. Any symptoms or trouble codes will also be disclosed. Applicability, warranty information, and any special instructions can also be found in the TSB. Always read the TSB in its entirety before beginning work, even if you are familiar with the reprogramming process. Application-specific instructions included in the TSB may save you from disaster.
Some battery chargers have the additional circuitry necessary to supply clean, steady power, but most do not. If the charger doesn’t have a specific power supply or reprogramming mode, it probably isn’t suitable for reprogramming use.
Go to the Nissan or Infiniti Techinfo sites to download ECU calibration files, NERs, and find detailed instructions.
Once you’ve confirmed that there is an applicable calibration file for the vehicle with a TSB, you’ll need to check the current ECU part number (which will change with every calibration). The current ECU part number can be retrieved with the CONSULT II, III, or III plus. If the calibration applies to the vehicle and the ECU part number reveals the calibration has not been applied yet, it’s time to start flashing.
Calibration files can be purchased and downloaded from the Nissan or Infiniti Techinfo sites (www.nissantechinfo. com or www.infiniti-techinfo.com). It’s not necessary to have a Techinfo account to purchase and download calibration files. However, you will need an account to view full TSBs, and access to the relevant TSB should be considered mandatory since it may contain information that is necessary for success.
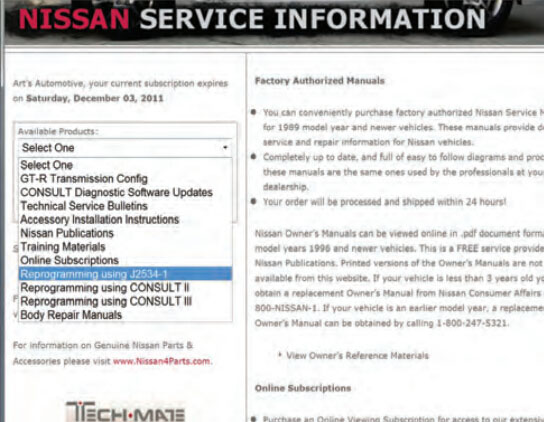
Techinfo subscriptions can be purchased for a single day ($19.99/day), 30 days ($2.50/day), 90 days ($2.50/day) or a full year ($720, or $2/day). The calibration files are a separate purchase, and are not included with the Techinfo subscription. Calibration files are $19.99 each. So the total cost for information and software will be between $22 and $40. The procedure for downloading the calibration file is fairly straightforward. Select the “Available Products” drop-down menu.
ECU Reflashing Using a J-2534 pass-thru interface
If you are using a J-2534 pass-thru interface, choose “Reprogramming using J-2534-1”. This will take you to a page that explains the requirements and allows you to download the NERs Operation Manual and purchase the NERs software if you don’t already own it.
Once you’ve read this page and verified you have everything you’ll need, click on the “Reprogram” tab. Once there, either enter the 10-digit ECU number in the search field, or select it from the drop-down menu. The ECU number should be retrieved with a scan tool, not by using the ECU label. The updated part number will then be displayed. Click on “Submit, Purchase, Check Out,” and continue to follow the prompts, entering your address, credit card information, etc.
Once purchased, you’ll be allowed to download the file. You’ll only have access to the download page for 24 hours, so download your purchases right away. You’ll need to place the downloaded files in a specific directory so that NERs will be able to find it. For a J2534 device, the directory is C:\Program Files\Nissan J2534 ECU reprogramming software\Application data\Reprogramming Data
If using the NERs and a pass-through device, follow the prompts to install the update. This has been a quick overview of the process. Full instructions are available in the NERs Operation Manual, and should be consulted before re-flashing.
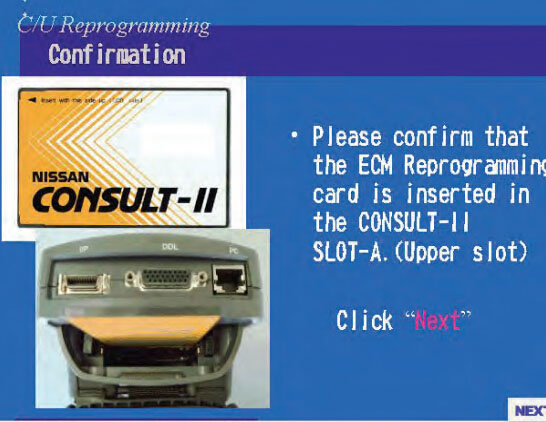
ECU Reflashing Using Nissan CONSULT II
If you plan to use the CONSULT II for a 2006 or earlier vehicle, there is an extra step. The purchased calibration must be downloaded from the Techinfo site toa PC, to a CONSULT II programming card, then to thevehicle. The transfer from the PC to the CONSULT II is done with free software available for download from Techinfo. You’ll find CONSULT II compatible calibration files and the free CONSULT II transfer software on theTechinfo site under “Reprogramming using the CONSULT II.”
The only tricky part of using the CONSULT II for reprogramming is transferring the files from the PC to the reprogramming card in the CONSULT II. There are two choices for data transfer, either RS-232 (serial port) or FTP (Ethernet port)
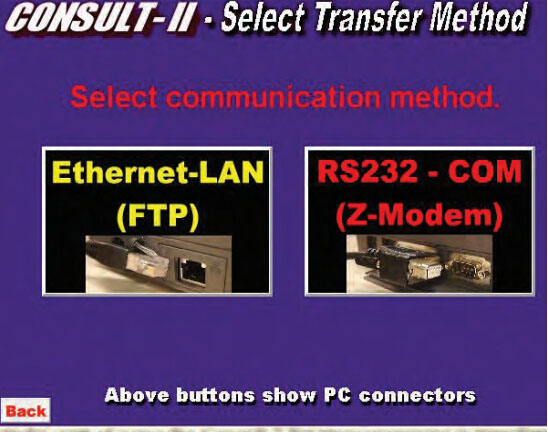
Consult II reprogramming file transfer options.
The RS-232 setup is simple, but is very slow and most PCs don’t have a serial port these days. If a PC lacks a serial port, you can purchase a USB to serial adaptor, but most of the time you’ll need to do a bit of setup and configuration to make it work.
The FTP transfer is fast, and virtually all PCs have a network card installed. However, if you’re a networking novice, the setup can be a little daunting. Typically, the easiest way to set up is to add the CONSULT II to an existing network structure. Just assign the CONSULT II an IP address that is unique, but still on the same subnet as other PCs on the network, then connect the CONSULT II via a standard Ethernet cable to a switch or router rather than using the crossover cable supplied with the CONSULT II. This method is faster than breaking the existing network configuration on the PC to use the crossover cable for a PC to PC (CONSULT II) connection. If this makes no sense to you, go with the serial connection and save yourself the hassle.
The Reprogram Card Operation Manual can be found in the CONSULT II reprogramming software, which is available as a free download from the Techinfo site on the “Reprogramming using the CONSULT II” page. The link to the manual is about seven clicks in the software. The PDF manual can be saved or printed, and should be read before attempting to use the software.
You’ll need this free software to transfer files from your PC to the Consult II.
ECU Reflashing Using Nissan CONSULT III and Consult III plus
The CONSULT III and III plus are a lot easier to use for reprogramming. The software you’ll need is already installed and the process is very straightforward. Purchase and download the calibration file to the directory specified in the readme.txt file that comes with the calibration, then install it on the vehicle. The relevant TSB will contain vehicle-specific instructions, and if you are not yet familiar with the procedures, there is usually a “click here” link within the TSB that will take you to more general reprogramming instructions.
Depending on the vehicle and the situation, there may be some post-flashing maintenance that needs to be performed. Specific instructions can be found in the TSB, so be sure to read the whole thing and follow all instructions.
Some ECUs can survive an incomplete flash. So, if you trip over the VI cable at 25% downloaded, don’t fall on your sword right away. You may be able to save the ECU before your boss finds out. You can find information about how to go about recovering after an incomplete re-flash in TSBs. Because TSBs can’t be searched with the Find Publications search, you may want to dig around a bit and find these two TSBs: CONSULT III Reprogramming General Procedure and the ECM Reprogram Interruption Recovery General Procedure. Print or save them before you need them, and one day you may be glad you did.