obd2tools

obd2tools

obd2tools

obd2tools

Original Autel MS908P Customer Feedback

(Tested) Original Autel MS908P Customer Feedback

I’m a Master Technician and shop owner for over 3 years specialized in BMW、AUDI、FORD etc. I tried many products and found some good ones and some are extremely terrible. What I want to mention is some good products of Autel. Now, I want to share my experience about MS908P.
Pros:
1、Coverage-With wide compatibility, it covers my BMW、AUDI、FORD. I do not need to buy other OBD products and it can easily to identify car’s VIN in a very short time.
2、Program- Compared other ones, it has comprehensive OE-Level diagnostic functions (program), which included DIY my personal settings in cars. My customers are like this. Besides, uniquely integrated vehicle programming capabilities working with a SAE J2534-1 & -2 compliant vehicle programming pass-thru interface, especially online programming function in BMW supported.
3、Highly sensitive LED touchscreen- With fast A9 qua- core processor, a32GB solid state hard drive and a short diagnostic time, I can handle multiple tasks easily and intuitively.
4、Full OBD II functions-Except read and clear codes and other basic functions, it has advanced vehicle diagnostics and analysis, live data, actuation tests, adaptations and ECU information. I think I can handle the daily problems with it.
Tip:
To be honest, this products is little expensive for individual, you can choose a cheaper one for your daily diagnose. It may more suitable for the professional technician and definitely worthy.

JMD Handy Baby II copy Fiat 48 no problem

MD Handy Baby II copy Fiat 48 no problem.

Images mean a lot.

JMD Handy Baby II:

JMD-Handy-Baby-II-1 JMD-Handy-Baby-II-2 JMD-Handy-Baby-II-3 JMD-Handy-Baby-II-4

JMD-Handy-Baby-II-5 JMD-Handy-Baby-II-6 JMD-Handy-Baby-II-7 JMD-Handy-Baby-II-8 JMD-Handy-Baby-II-9

SEC-E9 Key Cutting Machine BMW Automobile & Motorcycle Vehicle List

Look here: what kind of BMW keys can be decoded and cut with SEC-E9 CNC key cutting machine?

BMW automobile:

SEC-E9-Key-Cutting-Machine-BMW-Automobile-List

BMW motorcycle:

SEC-E9-Key-Cutting-Machine-BMW-Motorcycle-List

Test: SEC-E9 key machine cut key on BMW motorcycle F800 2006-

SEC-E9-key-machine-cut-key-test-on-BMW-motorcycle-F800-2006-1 SEC-E9-key-machine-cut-key-test-on-BMW-motorcycle-F800-2006-2 SEC-E9-key-machine-cut-key-test-on-BMW-motorcycle-F800-2006-3 SEC-E9-key-machine-cut-key-test-on-BMW-motorcycle-F800-2006-4 SEC-E9-key-machine-cut-key-test-on-BMW-motorcycle-F800-2006-5
SEC-E9-key-machine-cut-key-test-on-BMW-motorcycle-F800-2006-6 SEC-E9-key-machine-cut-key-test-on-BMW-motorcycle-F800-2006-7 SEC-E9-key-machine-cut-key-test-on-BMW-motorcycle-F800-2006-8 SEC-E9-key-machine-cut-key-test-on-BMW-motorcycle-F800-2006-9 SEC-E9-key-machine-cut-key-test-on-BMW-motorcycle-F800-2006-10

SEC-E9-key-machine-cut-key-test-on-BMW-motorcycle-F800-2006-11 SEC-E9-key-machine-cut-key-test-on-BMW-motorcycle-F800-2006-12 SEC-E9-key-machine-cut-key-test-on-BMW-motorcycle-F800-2006-13 SEC-E9-key-machine-cut-key-test-on-BMW-motorcycle-F800-2006-14 SEC-E9-key-machine-cut-key-test-on-BMW-motorcycle-F800-2006-15

How to Read, Reset and Write NEC Chip with CGDI MB

Here’s the guide to read, reset and Write NEC with CGDI Prog Mercedes Benz key programmer.

cgdi-mb-write-nec-chip-1

Dismantle key and desolder NEC chip

cgdi-mb-write-nec-chip-2
Clean PCB and NEC chip before soldering on CGDI NEC adapter

cgdi-mb-write-nec-chip-3
Identify NEC chip and solder onto NEC-board

cgdi-mb-write-nec-chip-4
Select NEC adapter and corresponding chip type

cgdi-mb-write-nec-chip-5
Read Key/Chip

cgdi-mb-write-nec-chip-6
Reset NEC chip

cgdi-mb-write-nec-chip-7
Reset success

cgdi-mb-write-nec-chip-8

cgdi-mb-write-nec-chip-9

If you have saved key files, click Open/Write, select a key file

cgdi-mb-write-nec-chip-10

Write success
Back to click on Read Key/Chip to confirm NEC chip status

cgdi-mb-write-nec-chip-11

cgdi-mb-write-nec-chip-12

CGDI MB write NEC chip success.

Note: If you need to repair Mercedes W204 207 212 ESL/ELV when NEC broken with CGDI MB, you need a Benz W204 ESL/ELV NEC chip for adaptation no need renew EIS.

cgdi-mb-write-nec-chip-13

Step 1 : replace with  our new nec chip
Step 2:  assemble back ESL
Step 3: read EIS data and save
Step 4: renew ESL and the erase password is all 1
Step 5: load eis data and password,tick auto clear tp and personalise and press write  And job is done !

No need for EIS renew!!!
No need to wait hours for disabled NEC chip to renew !!!
Adaptation done within a minute!!!

How to make Xentry PassThru work for New Models

Something good to help you to make Xentry PassThru on Windows 10 x64 support new Mercedes models (Euro5/6, W205, W213, W222). Done with VAS 5054A PassThru Driver

Xentry PassThru needs to be installed on Windows x64 to support new models, such as Euro5/6, W205, W213, W222 … However, VAS5054A didn’t work on 64bits as passthru. There is 64bits device driver for VAS5054A but there is no PassThru driver working on 64bits. You may try Actia driver instead but this is a patched 32bits PassThru API files with 64bit device drivers working on Windows 10 x64. Xentry recognizes it and works with W205 (confirmed), etc.

WARNING: Use it on your own risk, only for test purpose.

What you need:
(1) VAS5054A Bluetooth hardware. (genuine and good clone… both ok)
(2) (option) VAS5054A EDIC_PDU_API 1.20.4x driver installation file. You can find it somewhere on this forum.
(3) (option) New firmware. The firmware included here is version 1.20.41 for better compatibility, not 1.20.42.
(4) Softing_VAS5054A_PassThru_Driver_x64_v3.zip (attached here)
(5) 64bit Windows 10
(6) (option) DC 12V power adapter, 2 jumper wires for temporary power.

Pre Installation:
(1) Install Xentry PassThru and do all patches.
(2) (option) Install EDIC_PDU_API 1_20_42 driver (or EDIC_PDU_API 1_20_41). It’s for installing .NET framework or VC++ redistribution files.

If you are going to do clean install on fresh Windows 10, you might want to install the EDIC_PDU driver first. It installs .NET framework, VC++ files, some EDIC DLLs on /Windows/System32 or SysWow64. Other files will be overwritten by the below manual installation.

Installation:
(1) Copy “Program Files (x86)\Softing\*” to your HDD “C:\Program Files (x86)\Softing\*”
(2) Copy “Program Data\D-PDU API” to your HDD “C:\Program Data\D-PDU API”.
(3) Double click on “Softing_VAS5054A_PassThru_1_20_042.reg” and install it.
(4) Make a shortcut of “SftngCM.exe” on Desktop.
(5) Right click on “C:\Program Files (x86)\Softing\EdicDriver\win7\softingedic7_ntamd64.inf” and install.
(6) Connect the VAS5054A hardware using an USB cable. Connect it to a temporary power(12V DC adapter) or OBD-2 port.
(7) Check “Control Panel/Devices Manager/Softing…”. If not installed correctly, update the device driver manually.
(8) Make a shortcut of “EDICConfig.exe” on Desktop.
(9) (option) If you have newer version than EDIC_PDU_API 1_20_42 driver and genuine VAS5054A hardware, you may install the API driver now.

Post Installation:
(1) Connect the VAS 5054a to a temporary power(12V DC adapter) or ODB-2 port.
(2) Run “SftngCM.exe” on desktop as administrator. Make a “C:\Temp” directory if not exists. This is for saving log files. If not exists, SftingCM.exe will cause error when doing test.
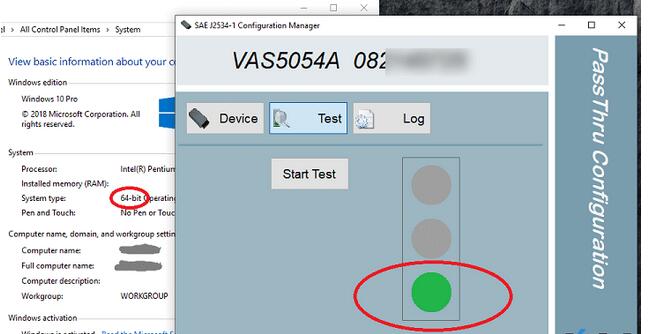
(3) Choose “VAS5054A” and type the serial number (maybe 0821xxxxx).
(4) Select “Test” and click on “Start Test”.
– RED dot : PC <-> VAS5054A does not communicate. Something wrong on your driver.
– YELLOW dot : PC <-> VAS5054A communicates.
– GREEN dot : PC <-> VAS5054A <-> Vehicle communicates.

Tip:

(1) “.NET Framework 2.0/3.0/3.5” needs to be installed if not installed automatically. You can install it by selecting on “Control Panel/Programs and Features/Turn Windows features on or off/.NET Framework 3.5(includes .NET 2.0 and 3.0)”. You also need to install VC++ redistributions if not done yet. (MSVCR100.dll, mfc100.dll, … errors)

(2) Temporary power to VAS5054A for test purpose : Ground to either pin 4 or 5. 12V DC to pin 16.

(3) You can upgrade the EDICDriver in “Program Files (x86)\Softing\EDICDriver” if you have newer version. Update the device driver on control panel.

(4) If you installed newer version EDIC_PDU_API driver than 1.20.42, edit the *.reg and change the number 1_20_42 to your number (for example, “EDIC_D_PDU_API_1_20_042” to “EDIC_D_PDU_API_1_20_0XX”). After editing, double click on it and install it again.

(5) If your device has different serial number but SftngCM.exe doesn’t allow the change, edit the *.reg file with text editor, double click on it and install it again.

vas5054a-windows-10-setup