The following information is freely available on the internet, however, has been consolidated here to help the DIYer in interface configuration (Rheingold, ISTA-D and ISTA+ all are all simultaneous and are used interchangeably. For the purposes of this document, we will only use 3 interfaces, K+DCAN, ENET and ICOM. Additional configuration of these interfaces is not discussed here. Refer to other publicly available information on the internet or specific forums.
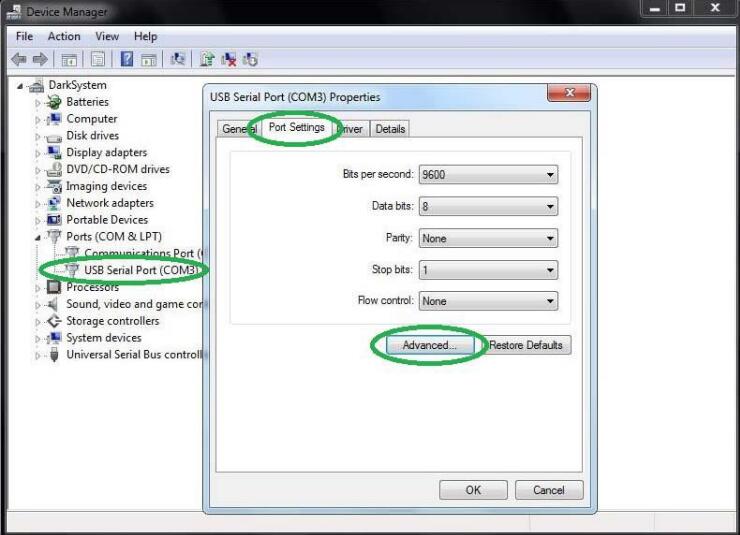
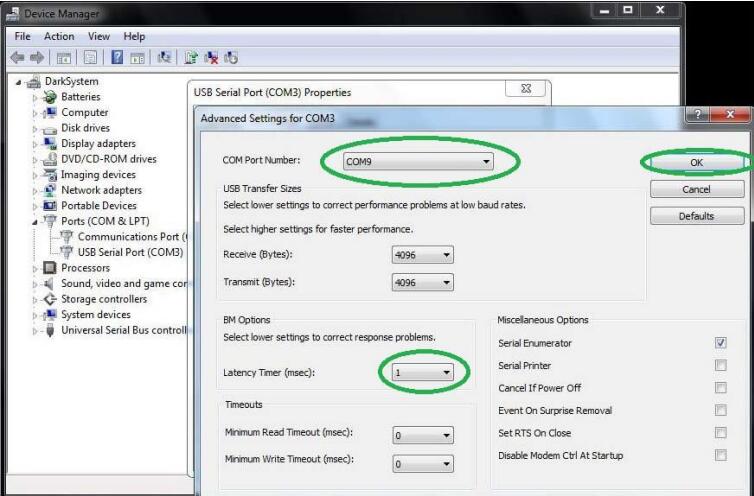
USING ISTA WITH USB K+D-CAN CABLE (Example using Com Port 9) 1. Plug your K+D-CAN cable and install drivers. For FTDI based cables use latestdrivers. 2. Open “Device Manager”, then USB Serial Port properties, go to “Port Settings” tab and click “Advanced…”. Change port number to “COM9” and latency timer to “1”. Confirm configuration via “OK” button.
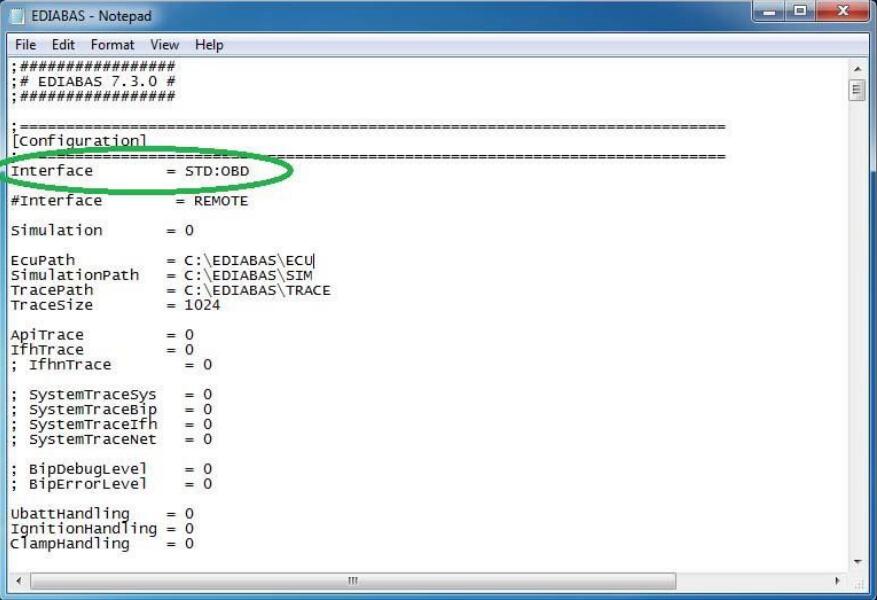
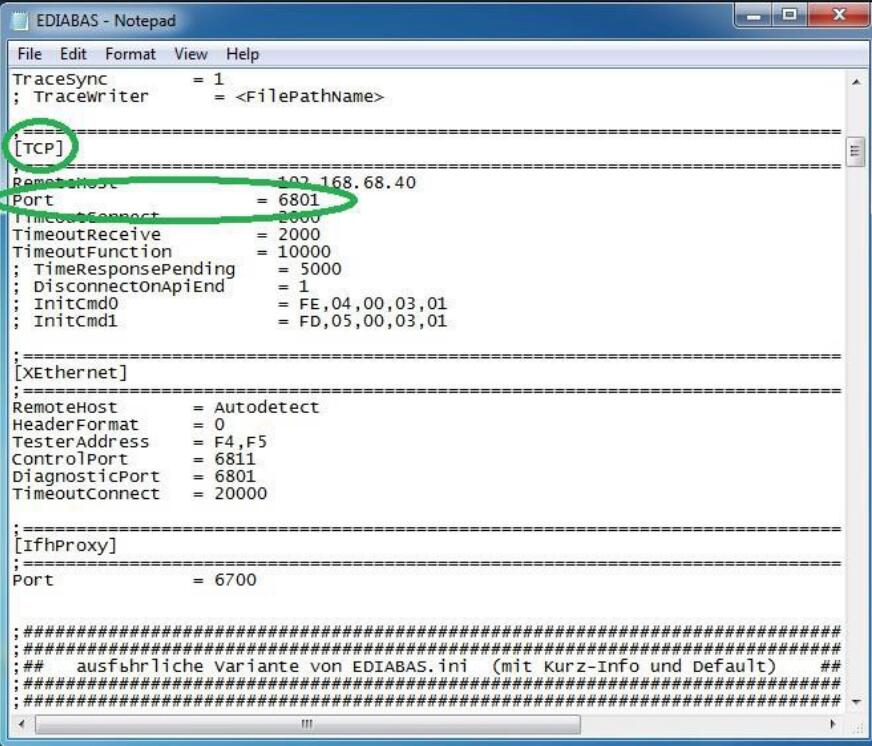
3. Open C:\EDIABAS\BIN\EDIABAS.INI with Notepad and check for “Interface = STD:OBD”. In TCP settings set “Port = 6801”.
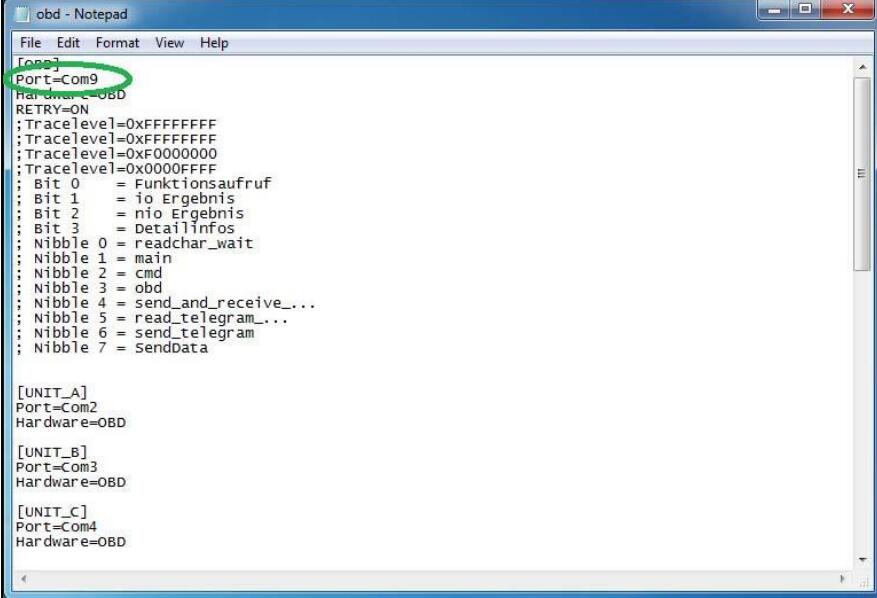
4. Open C:\EDIABAS\BIN\OBD.INI with Notepad and check for“Port=Com9”.
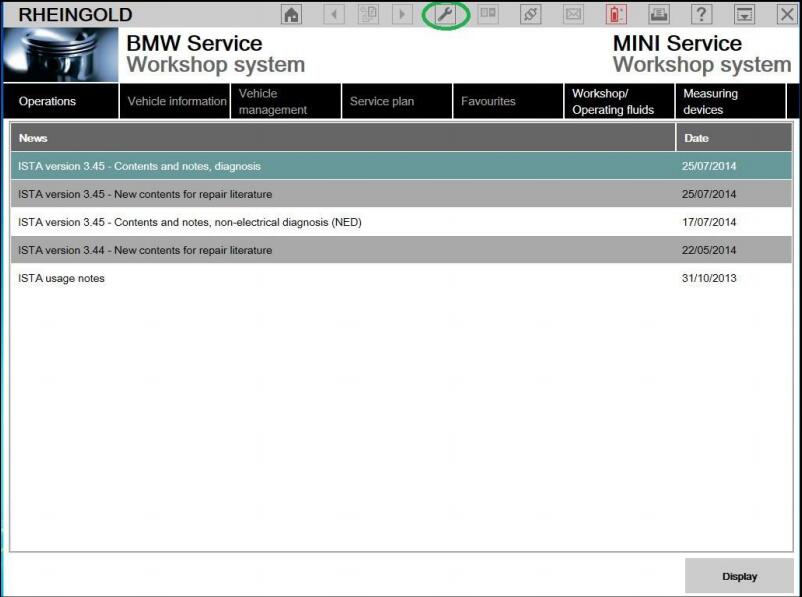
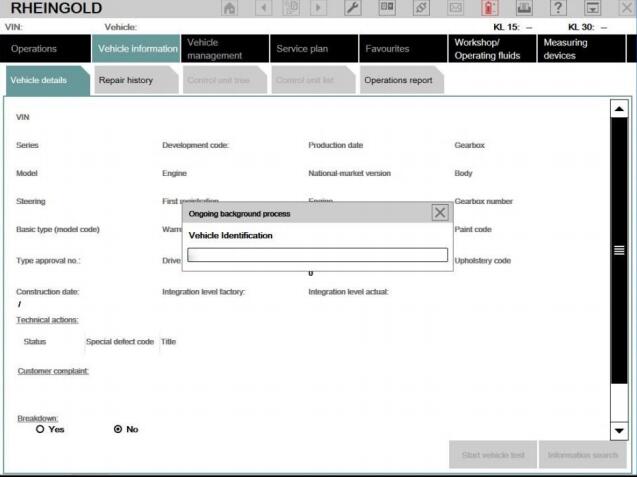
5. Connect car with K+D-CAN cable to PC. 6. Now run BMW Rheingold ISTA using shortcut in start menu and wait until it boots, then press settings button.
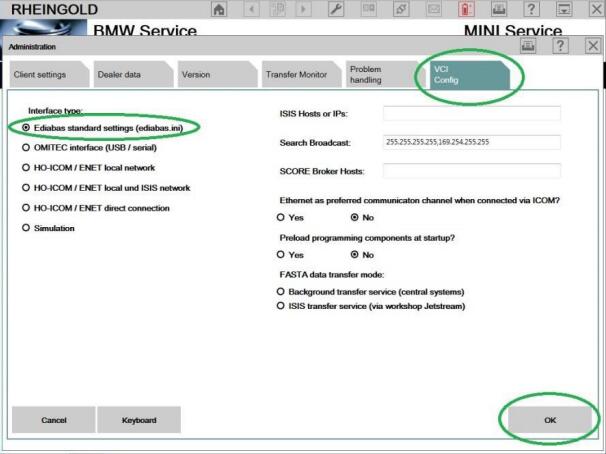
7. Select “VCI Config” tab and “Ediabas standard settings (ediabas.ini)”, then “OK”.
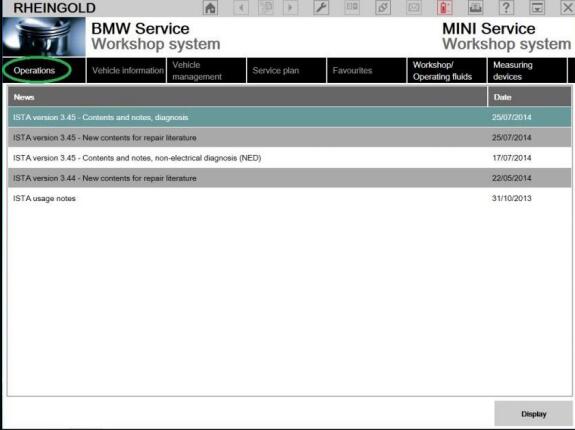
8. Go “Operations”, then “Read Out Vehicle Data” and “CompleteIdentification”. Back to Table of Contents
Introduction to JLR CCF Tools and VBF Editor JLR CCF (Control Configuration Files) tools and VBF (Vehicle Bus File) editor are software applications specifically designed for Jaguar Land Rover dealerships to configure and program vehicle control modules. These tools are only meant to be used by trained and certified technicians who have a working knowledge of vehicle systems and their components.
JLR SDD (Jaguar Land Rover Standard Diagnostic Device) Pathfinder is a software application used by Jaguar Land Rover dealerships for diagnosing and repairing vehicle systems. It allows technicians to access vehicle diagnostic information and perform various functions, such as reading and clearing fault codes, programming modules, and checking system status.
How to Use VBF Editor CCF Tools and VBF Editor
Here is a step-by-step guide to using the JLR CCF tools and VBF editor: Step 1: Connect Diagnostic Device to Vehicle
Connect the JLR Standard Diagnostic Device to the vehicle’s OBD-II (On-Board Diagnostic) port.
Launch the JLR SDD Pathfinder software and select the appropriate module that needs to
Step 3: Load CCF or VBF File
Load the relevant CCF or VBF file into the tool.
Step 4: Make Changes to Configuration or Programming
Using the CCF or VBF editor, make the necessary changes to the configuration or programming.
Step 5: Save Updated File to Diagnostic Device
Save the updated file to the diagnostic device.
Step 6: Upload File to Vehicle Control Module
Upload the updated file to the vehicle control module using the diagnostic device.
Step 7: Verify Changes
Verify that the changes have taken effect by performing a system test or checking for fault codes.
Conclusion
The CCF tools and VBF editor are powerful tools for configuring and programming vehicle control modules, but their use requires specialized training and certification. By following the steps outlined above, trained and certified technicians can effectively use these tools to diagnose and repair vehicle systems.
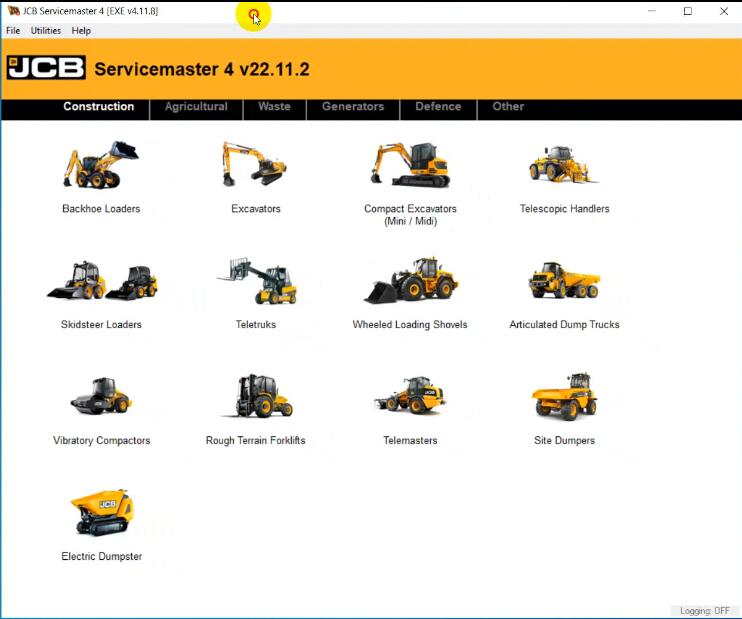
What is JCB ServiceMaster 4? JCB ServiceMaster 4 is diagnostic software, which contains complete information for diagnostics and calibration of agricultural machinery and engines company JCB.Setting a diagnostic program JCB ServiceMaster 4 on personal computer users have access to view a variety of information, including information that is stored on one DVD.
JCB ECU’s All Modules Flash File Download
JCB ServiceMaster 4 Support Language: English, Italian, German, French
JCB ServiceMaster 4 Functions List: – Troubleshooting; – Standard Test service; – View and edit generated data; – ECU Flash files with the correct data
Other: JS Range, JZ70, Backhoe Loader, Loadall 2007-, Loadall 2007+, Loadall Agri Extras, Loadall Construction extras, Robot, Teletruk, Midi Excavator 801-8065, 8080-8085, Dump Truck, Large Wheel Loading Shovels, Compact Wheel Loading Shovels, Fastrac 2000-3000 Series, Fastrac 3000 Series 2, Fastrac 8250 Series 1, Fastrac 8250 Series 2, Fastrac 7000 Series 1, Vibromax, JCB Dieselmax Engine, JCB Engine (IPU OEM), JCB Engine (Base Engine OEM), JCB Generators, LiveLink I, LiveLink II.
JCB ServiceMaser 4 Requirements: Windows XP 32 bit, Windows 7 32 bit, Wnidows 7 64 bit, Windows 8/8.1 32 bit, Windows 8/8.1 64 bit, Windows 10 32 bit, Windows 10 64 bit – CPU: Pentium/Athlon 2 GHz or higher – RAM: 512 MB of system memory – Hard Drive: 25 GB of available space – Optical Drive: DVD-ROM
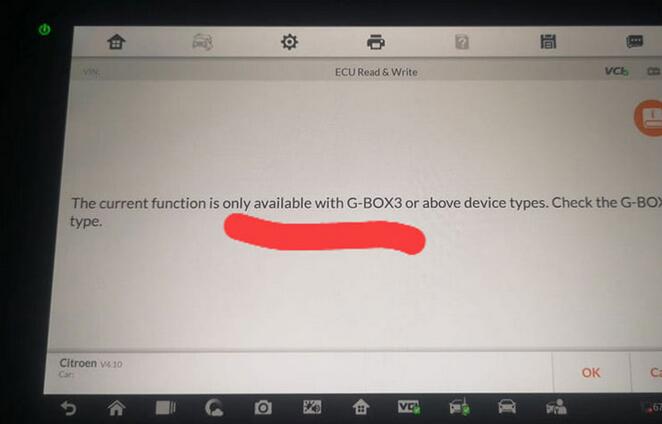
An Autel im608 user tried to clone the Citroen ECU without opening the ECU in the Immo section. Connection is easier than KTAG but IM608 ask for G-Box3. What is the Gbox3? What is the difference between Gbox2 and Gbox3?
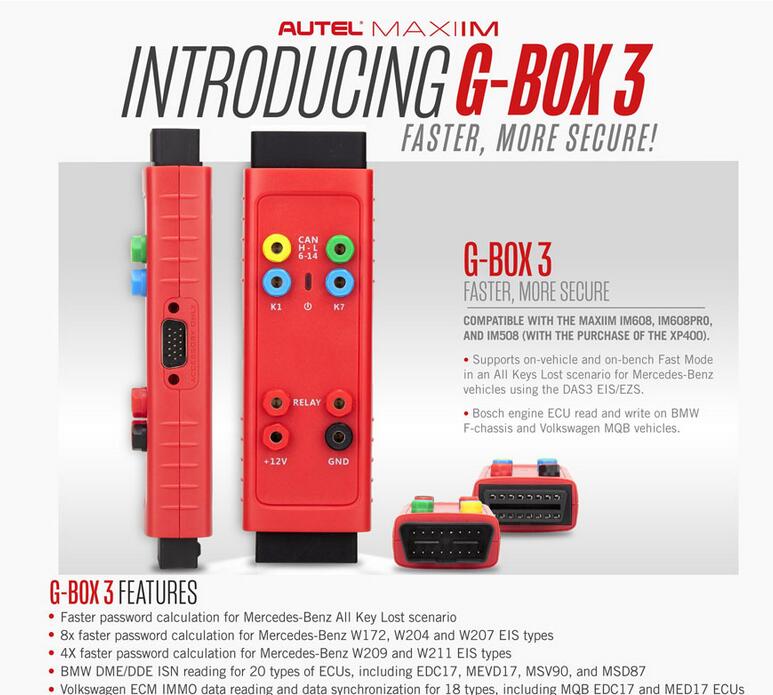
Autel G-box3 is a brand new key programming adapter for MaxiIM series. It is the update version of G-box2.
What’s new in Autel G-box3? • FASTER, MORE SECURE • Supports on-vehicle and on-bench Fast Mode in an All Keys Lost scenario for Mercedes-Benz vehicles using the DAS3 EIS/EZS. • Bosch engine ECU read and write on BMW F-chassis, PSA group and Volkswagen MQB vehicles
G-B0X 3 FEATURES • Faster password calculation for Mercedes-Benz All Key Lost scenario • 8x faster password calculation for Mercedes-Benz W172, W204 and W207 EIS types • 4X faster password calculation for Mercedes-Benz W209 and W211 EIS types • BMW DME/DDE ISN reading for 20 types of ECUs, including EDC17, MEVD17, MSV90, and MSD87 • Volkswagen ECM IMMO data reading and data synchronization for 18 types, including MQB EDC17 and MED17 ECUs • Bosch engine ECU read and write on Volkswagen, BMW, and PSA group vehicles. The G-Box3 adapter, is compatible with the MAXIIM IM608, IM608PRO, AND IM508 (with an additional purchase of XP400).
What is the difference between Gbox2 and Gbox3 Gbox2 makes Mercedes all keys lost faster, Gbox3 makes it 4x/8x faster Gbox3 offers faster and more secure reading and writing of Bosch EDC17, MEx17, MD1, and MG1 ECUs and supports on vehicle.
Gbox3 is under testing and will be released very soon.
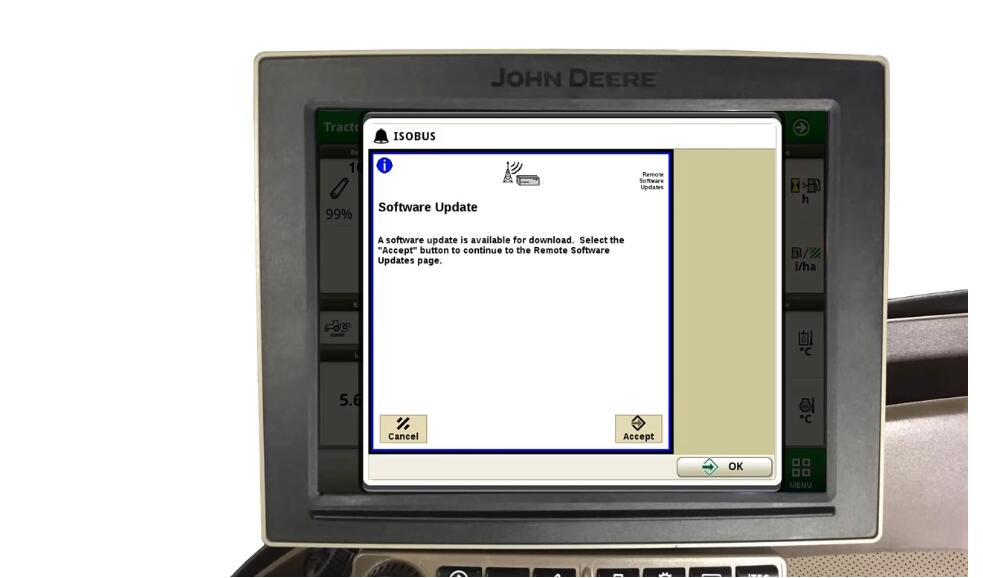
You love your John Deere software, but in order to keep it working smoothly with your Generation 4 CommandCenter, you need to be aware of updates to the overall system. Luckily, there are step-by-step instructions you can follow to keep your software up-to-date and running efficiently.
Let’s take a look at how you can utilize your John Deere software and take advantage of any upgrades along the way.
* First, it’s important to note that your local dealership can send a wireless software improvement to eliminate the need to travel to your machine. * John Deere can also send wireless software improvements to update your machine. In this case, you will receive a letter via mail detailing why you are receiving the John Deere software update. About two weeks later, a message will appear on the display of your machine, informing you of the available software update. * The first step in updating your software begins with a download. When prompted, your machine’s screen will ask you to download a “Software Update” for the latest features. The downloading process can occur while the machine is still operating out in the field. * The second step in updating your software is installing the actual download. During this time, the machine will need to be turned off. With the key switch on, it can take up to 20 minutes to install the downloaded update. * During the first step, the machine’s screen will ask you to either “Cancel” the software update or “Accept.” Regardless of what you choose, you will be redirected to the remote software update screen, where you can either “Reject download,” “Download software” or “Install software.” The final option can only be completed once the latest update has been downloaded. * If you choose “Reject download,” your John Deere dealer may need to visit you at a later date to manually install the John Deere software update. * You can also select the “X” in the top right-hand corner of the screen. This will return you to the main screen. * After the software update has been downloaded, you can return to the remote software updates menu and select “Install software.” The machine will need to be off during this process, and the installation can take up to 20 minutes. * Do not start the engine or turn the key switch off during the installation process.